Unit plans · Design
Bridge Building
DesignGrade 610 lessons
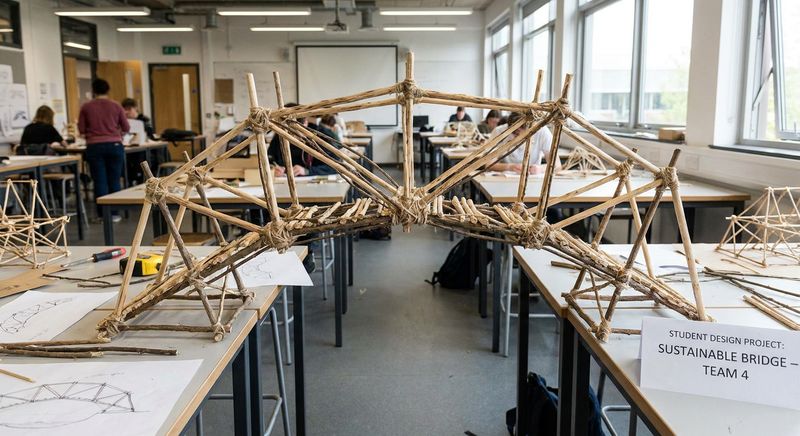
In this Grade 6 design unit, students become civil engineers tackling a real challenge: build a wooden stick bridge that spans a set distance and holds the most weight. They start by studying famous bridges and why some fail, then research different bridge types through live demonstrations and jigsaw activities. Students develop two concept sketches, use a decision matrix to choose their best design, and build their bridge following a process log. They test their structure's load capacity, annotate images to explain what they built, and use a Feedback Capture Grid to refine their thinking.
The unit combines hands-on building with multiple rounds of digital bridge simulation, letting students test ideas before construction and iterate their designs based on feedback. Students learn the vocabulary and structural principles that make bridges strong, apply those principles to their own designs, and document their engineering process throughout.
The lessons
1
Launch — Become a Civil Engineer
45 min · 5 activities
Lesson shape
Opening5 minMini-lesson10 minWork time25 minDebrief5 min- OpeningStructure under load8 min
Tacoma Narrows: Why Bridges Fail
On 7 November 1940, one of the world's newest suspension bridges twisted itself apart — not from a heavy load, but from wind. Understanding what went wrong is where bridge design begins.
Watch your teacher show the Tacoma Narrows collapse. Then drag the load slider to see how forces travel through the structure.
As you watch and explore, hold these questions in your mind:
- Which members turn red (tension) and which turn blue (compression)?
- What happens to the structure when the load increases?
Be ready to share one thing you notice with the class.
Look for: Student can name at least one member that goes into tension and one into compression, and can say in their own words why adding load changes the structure.
- Inspiration board15 min
Find examples of famous bridges you know of
Upload 3–5 images (take a screenshot or save to your computer then upload here).
For each, write which country or city its located in. If you know what kind of bridge it is write that too
Look for: 3 - 5 bridges
- DebriefQuiz check8 min
Design Terms: Quick Check
You have used the words constraint, function, strength requirement, and aesthetic in this lesson — now show you know exactly what each one means.
Answer each question. If you get one wrong, read the hint and try once more.
Look for: Student scores at least 3 out of 4 and can distinguish each term from the others.
- OpeningExample sort7 min
Decode the Bridge Brief
Before you can design anything, you need to read the brief carefully and understand exactly what it is asking of you.
Sort each fragment from the unit brief into the correct category. Click a fragment, then click the column where it belongs.
Look for: All fragments correctly sorted; student can explain in one word why each belongs in its column.
- Work timeWritten answer5 min
Restate the Challenge (Individual)
Writing the challenge in your own words locks it into your memory — and gives you a reference point for every design decision you make from here on.
In your own words, write one or two sentences that answer both of these questions:
- What must your bridge do? (function and load)
- What limits must you work within? (at least two constraints)
Do not copy the brief word-for-word — use your own language.
Look for: Two sentences that name the function, the load target, and at least two constraints in the student's own words.
2
Research Bridge Types
45 min · 9 activities
Lesson shape
Opening5 minMini-lesson10 minWork time25 minDebrief5 min- Inspiration board15 min
What types of bridges exist?
Find examples of the 3 types of bridges (beam, arch, or truss). Insert them below and lable them
Look for: You can name one specific pattern across your 5 images — something a stranger could spot from the board alone.
- Mini-lessonStructure under load8 min
Beam vs Truss: Live Force Demo
A flat beam and a triangulated truss can span the same gap — but they behave very differently under load. Watch what changes when you add weight.
Before dragging the load slider, predict in your head: which members do you think will be stretched (tension) and which will be squeezed (compression)? Then drag the slider from 0 to maximum and watch the colours. Red = tension, Blue = compression. Be ready to share one thing you notice.
Look for: You can point to at least one red member and one blue member and say which force each one carries.
- Mini-lessonReading6 min
What Makes a Bridge Strong?
Every bridge — from a log across a stream to a steel cable suspension — works by controlling just two forces. Understanding these two forces unlocks every bridge type you will research today.
Read each card carefully. The word in bold is the one term to take away from that card. Be ready to give one example of each force from everyday life.
- Compression: **Compression** is a squeezing force. It pushes inward on a material, trying to shorten or crush it. The bottom of an arch and the top chord of a beam are in compression.
- Tension: **Tension** is a stretching force. It pulls outward on a material, trying to lengthen it. The bottom chord of a beam bridge and cables on a suspension bridge are in tension.
- Load & Span: The **load** is any weight the bridge must carry. The **span** is the distance it must cross. A longer span with a heavier load creates bigger forces — so the structure must be designed carefully.
Look for: You can say in your own words what compression and tension feel like, and name one part of a bridge where each one acts.
- OpeningExample sort5 min
Bridge Vocabulary Sort
Before we build anything, engineers need a shared language — sorting these terms into groups shows you which ones you already know.
Sort each word or phrase into the correct column: Forces, Structure, or Design Process.
Look for: All nine terms are placed correctly with no items left unsorted.
- Bridge builder10 min
Get the truck over. Start by laying a road straight across — then test it and watch what happens. Fixing what you see is the actual task.
Build a bridge across the 40-unit gap for Small truck, then test it.
Look for: The truck gets across AND the student can say which pieces were being pulled, which were being squashed, and why.
- Work timeWritten answer15 min
Jigsaw Research: Bridge Types
Real engineers specialise in one area and then share what they know with their team — that is exactly how your jigsaw group works today. You pick the bridge type you are most curious about, become the expert on it, and then teach your teammates.
Step 1 — Choose your bridge type. Pick ONE that interests you most: beam, arch, or truss. (Check with your group first so that ideally each type is covered by at least one person.)
Step 2 — Research your bridge type. Find answers to these three questions:
- How does your bridge carry load? Where does compression act? Where does tension act?
- What is its key structural feature — the one design detail that makes it work?
- What is one real-world example of this bridge type?
Step 3 — Prepare a short explanation you can teach out loud. You do not need to write an essay; dot points or a quick sketch to point at are fine.
Step 4 — Take turns teaching. Each person in the group explains their bridge type while the others listen and ask at least one question. Aim for about 2–3 minutes per person.
Look for: After the teaching round, every person in the group can answer these three questions for all three bridge types — beam, arch, and truss — in their own words, without reading from notes.
- Work timePhoto or file upload8 min
Labelled Bridge Diagram Upload
A labelled diagram is how engineers communicate their understanding visually — adding labels turns a sketch into a technical document.
On paper, draw a clear diagram of your bridge type (beam, arch, or truss).
Your diagram must show and label:
- The main structural shape or feature (e.g. triangles, arch curve, flat beam).
- An arrow or note showing where compression acts.
- An arrow or note showing where tension acts.
- The load (shown as a downward arrow at mid-span) and the span (the distance between supports).
When you are happy with your diagram, take a clear photo and upload it here.
Look for: Your uploaded photo shows a clear diagram with at least four labels: the structural feature, compression, tension, and load.
- Work timeQuestion steps10 min
Research Findings Record
Recording what you learned cements it — and gives you notes to return to when you design your own bridge.
Answer each question about your bridge type. Use what you researched and what your group taught you.
- What is the name of your bridge type, and what is its key structural feature?
- Where does compression act in your bridge type? Where does tension act? Be specific about which part.
- What is one real-world example of your bridge type, and why was it a good choice for that location or span?
- After hearing your group's teaching, what is the biggest difference between a beam bridge and a truss bridge in how they handle a load?
Look for: All four questions are answered with specific details — not just one word, but a sentence that explains the reason.
- DebriefQuiz check6 min
Forces & Bridge Types: Check
A quick check to see how firmly today's key ideas have landed — this is just for you and your teacher, not a grade.
Answer each question. If you get one wrong, read the hint carefully before trying again.
Look for: You score at least 4 out of 5, and you can explain why your wrong answers were wrong.
3
Design your BridgeAssessment
53 min · 8 activities
- The brief
Your task
What you're making You are designing and planning a bridge — moving through individual ideation, team decision-making, and scaled technical drawing before building. Your process evidence (sketches, annotations, decision matrix, scale plan, and written justification) is your assessed work alongside the final built bridge.
Who it's for Your designs and plans communicate your thinking to your team and to your teacher, just as a real designer would present proposals to a client and collaborators before construction begins.
What you must do — follow these steps in order
- Step 1 — Individual concept sketches: Fold one sheet of A4 paper in half. Use each half to sketch a different bridge type — one design per half, giving you two distinct concepts.
- Step 2 — Annotate your sketches: On each sketch, add clear annotations that include:
- dimensions (measurements)
- materials to be used
- how joints are made/connected
- features that make the bridge stronger
- Step 3 — Upload your sketches: Photograph both annotated designs and upload the image to this summative task. …
- Reading5 min
Step 1
Individual concept sketches: Fold one sheet of A4 paper in half. Use each half to sketch a different bridge type — one design per half, giving you two distinct concepts
- Reading5 min
Step 2
Annotate your sketches: On each sketch, add clear annotations that include:
- dimensions (measurements)
- materials to be used
- how joints are made/connected
- features that make the bridge stronger
- Photo or file upload15 min
Step 3: Upload your 2 concept sketches
Upload your 2 concept sketches here
- Work timeDecision matrix20 min
Step 4: Now that you've sketched four possible bridge designs, you need a fair way to test which one will actually work best for your build.
- Open the decision matrix (provided). List your 4 sketch designs (names/letters) in the rows.
- Score each design on these four criteria: • Triangle count: How many triangles does the design use? (More = higher score) • Base stability: How wide is the base relative to height? (Wider base = higher score) • Buildability in time: Can you build it in the time allowed? (Yes/realistic = higher score; risky/rushed = lower score) • Within materials budget: Does it fit your available materials? (Yes = full score; exceeds = deduct points)
- Weight the criteria
- Calculate the total weighted score for each design.
- Circle or highlight the design with the highest score as your team's winner.
Look for: Each sketch is scored consistently across all four criteria with a clear weighting applied; one design has the highest total score and is clearly marked as the winner.
- Work timeSentence builder8 min
Your decision matrix has surfaced a winner — now lock in your reasoning by building the two sentences your team will stand behind.
Using the fragments below, construct your team's two-sentence justification: • Sentence 1 — name your chosen design and the single criterion it scored highest on. • Sentence 2 — name the trade-off your team accepted and explain why the winning design was still the best choice overall.
Drag the correct fragment into each blank, then read both sentences aloud to check they make sense together.
Look for: Both sentences are complete, name a specific design and criterion from your own matrix, and the trade-off blank is filled with a genuine compromise — not a strength.
- Rubric shown to students
How this is marked
- Hand-in
Hand it in
4
Build Your BridgeAssessment
10 min · 4 activities
- The brief
Your task
What you're making You will design and build a bridge using only the provided materials, then document the entire process — from first ideas through to your finished structure — as an evidence portfolio supported by step-by-step photographs.
Who it's for Your portfolio is addressed to a design panel reviewing your thinking and making skills. The bridge itself demonstrates your ability to solve a structural engineering challenge; the documentation shows how and why you made every decision along the way.
What you must include Your submission has two parts — the physical bridge AND the process portfolio:
Process portfolio (ongoing — built throughout the project):
- A photograph of each step of your build, clearly labelled
- A written explanation for each step covering:
- What you did at that step
- What materials or tools you used and why
- What you learnt — including what worked, what didn't, and what you would do differently
- Evidence of early research and planning (sketches, diagrams, notes, tests)
- Notes on any design changes you made mid-process and the reasons behind them
Final outcome: …
- Process log10 min
Log what you made today — a photo and what you did.
- Rubric shown to students
How this is marked
- Hand-in
Hand it in
5
Test your bridgeAssessment
50 min · 7 activities
- The brief
Your task
What you're making This is the final testing and reflection stage of your bridge project. You will stress-test your bridge to breaking point, document the results, and produce a written reflection that feeds directly into your next design iteration.
Who it's for Your evidence is for you as a designer — honest, detailed documentation of what worked and what failed is what drives real improvement. It also forms part of your ongoing design portfolio showing your full process.
What you must include
- Destructive test — load your bridge until it fails; record the maximum load it held
- Annotated photo — take a clear photo of your tested bridge and annotate it, labelling where it was strongest and where/why it failed
- Class comparison — record the results of the class's strongest bridge; describe what made it outperform others
- Reflection on your own bridge — explain what went well, what failed, and why (link to your construction choices and materials)
- Next-design plan — write specifically about what you will change or keep in your next bridge design and explain how those changes will address the weaknesses you found …
- Written answer10 min
How Much Weight?
Write down the max amount of weight your bridge could carry.
- Work timeQuestion steps15 min
The strongest bridge in class teaches us something — use the load result and what you can see to figure out what made it work.
Look at the bar chart showing all the class bridges' load results. Then examine the strongest bridge (or photos of it if it's not available). Answer each question in order, using what you observe and the engineering terms your class has learned.
- What load did the strongest bridge hold? Give the exact result from the chart.
- Describe the shape and structure you see. What are its main parts — deck, supports, joints, materials?
- Name at least two structural features that helped this bridge support so much weight. Use one engineering term for each.
- Of the bridges that failed before this one, why did they hold less? What is this winning bridge doing differently?
Look for: You name the load held, describe at least two visible structural features of the winning bridge, and explain how each feature helped it carry that weight using terms like compression, tension, triangulation, or distributed load.
- Work timeImage annotate15 min
Now you'll identify exactly where your bridge succeeded and where it broke — so you can understand why those spots matter.
Upload a clear photo of your tested bridge. On the image, place three labelled pins:
- Strongest zone — mark where the bridge handled the load best (the area that showed least damage or deformation)
- Failure point — mark exactly where the bridge broke, bent, or began to collapse
- For each pin, write one sentence explaining the structural reason — what about the materials, joints, shape, or support at that spot caused it to behave that way?
Be specific: instead of "strong here," write "double-layered deck here distributed load across two pathways" or "single paper join here — no reinforcement."
Look for: Your photo shows both zones clearly marked with pins, and each annotation links a visible structural feature (materials, joint type, thickness, support pattern) directly to its performance.
- DebriefWritten answer10 min
Now that you know exactly where and why your bridge failed, and what made the strongest bridge succeed, you can design your next one more intelligently.
Write a plan for your next bridge that:
- Names the specific part that failed on your bridge and explains why it broke first (reference your annotated photo)
- Identifies at least one design choice from the class's strongest bridge that you will copy or adapt — explain how it addresses your failure point
- Describes 2–3 concrete changes you'll make to materials, joints, geometry, or construction method, and predicts how each will improve strength or load capacity
Look for: Your response clearly links your failure to specific design improvements, shows evidence of learning from the strongest bridge's structure, and proposes testable changes you can actually build next time.
- Rubric shown to students
How this is marked
- Hand-in
Hand it in
6
Checkpoint 1Checkpoint
No activity detail for this lesson.
7
Bridge Simulator 2
45 min · 1 activity
Lesson shape
Opening5 minMini-lesson10 minWork time25 minDebrief5 min- Bridge builder10 min
Cable costs less than half what a beam does — but a cable can only PULL. Squash one and it goes slack and carries nothing at all. Build this one within budget and you will have to put the cables where they get stretched.
Build a bridge across the 60-unit gap for Delivery truck, then test it.
Look for: The truck gets across AND the student can say which pieces were being pulled, which were being squashed, and why.
8
Bridge Simulator 3
45 min · 1 activity
Lesson shape
Opening5 minMini-lesson10 minWork time25 minDebrief5 min- Bridge builder10 min
A wider gap and a heavier truck. Long pieces that get SQUASHED buckle long before short ones do — a piece three times as long holds about a ninth as much. Struts cost more but resist it far better. Spend that money only where it is needed.
Build a bridge across the 80-unit gap for Loaded truck, then test it.
Look for: The truck gets across AND the student can say which pieces were being pulled, which were being squashed, and why.
9
Bridge Simulator 4
45 min · 1 activity
Lesson shape
Opening5 minMini-lesson10 minWork time25 minDebrief5 min- Bridge builder10 min
This is the bridge you are about to build for real. One unit on screen is 1 cm, so a piece of bamboo is 30 units long and the gap is 40 — no single stick reaches across. Whatever works here is worth trying on the bench.
Build a bridge across the 40-unit gap for Test load, then test it.
Look for: The truck gets across AND the student can say which pieces were being pulled, which were being squashed, and why.
10
Upgrade Bridge Simulator
45 min · 5 activities
Lesson shape
Opening5 minMini-lesson10 minWork time25 minDebrief5 min- OpeningExample sort6 min
Before you write your ideas for improvement, sort what you saw in the bridge simulator — clear observations help you write better design responses.
Read each observation card from the bridge simulator. Click a card, then click the column where it belongs: did this show something that worked well, or something that could be better?
Look for: All 10 cards are placed correctly — you have a clear list of "worked well" and "could be better" observations ready to use in your writing.
- Mini-lessonReading5 min
Three principles for strong design suggestions
Before you write your improvement suggestions, you need to know what makes one actually useful to a simulator designer.
Study the three cards below. Each one shows a principle that separates a vague wish from a suggestion a designer can actually act on. You'll use these principles to guide your written work in the next section.
- Specific and actionable: Name exactly what you want to change and how. Not 'make it stronger' but 'add cross-bracing between the tower legs' or 'increase the beam diameter from 10 mm to 15 mm'. A designer needs to know what to do.
- Grounded in evidence: Point to what you saw in the simulator. 'The beam snapped at mid-span' or 'the tower swayed when I added the load' gives you proof. Your suggestion is stronger when you can say *why* you think the change will help.
- Problem → Fix link: Connect the dots. Don't just say what to change; explain how your fix addresses the problem you observed. 'The joint failed, so I'd reinforce it with a gusset plate' shows the logic. A designer can then decide if you're right.
Look for: You can explain each principle in your own words and spot an example of it (or spot when it's missing) in a design suggestion.
- Work timeThinking tool: Feedback Capture Grid12 min
You've tested the bridge simulator and spotted what worked, what didn't, and what could be different — now organize those observations into a tool that will help you write strong improvement suggestions.
Open the feedback grid and fill in each section based on your simulator experience:
Likes — what did the simulator do well? What made testing your design easy or realistic?
Wishes — what was frustrating or didn't work the way you expected? (Example: the beam snapped without warning; the load indicator was hard to read.)
Questions — what did you wonder about while testing? What wasn't clear? (Example: Why did the bridge fail there? How does that material choice affect the result?)
Ideas — what could the simulator makers change or add to make it better? Write at least one idea in each section. Be specific — name a feature, a problem, or an observation from your bridge tests.
Look for: Your grid is filled with specific, concrete observations from your simulator tests — each entry describes what you actually saw or did, not a general comment. You have at least one idea ready to develop into a full improvement suggestion.
- Inspiration board15 min
Find a visual style you like
Upload 3–5 images from cartoons, computer games, etc. For each, write one sentence about what caught your eye. When you have 3+, write one sentence about what they all share.
Look for: You can name one specific pattern across your 5 images — something a stranger could spot from the board alone.
- Inspiration board15 min
Draw and colour your design idea.
iPad or markers ok. Take a photo and upload it here. Then share with class ('pin to class' at bottom of this activity)