Unit plans · Design
Microbit Robots
DesignGrade 811 lessons
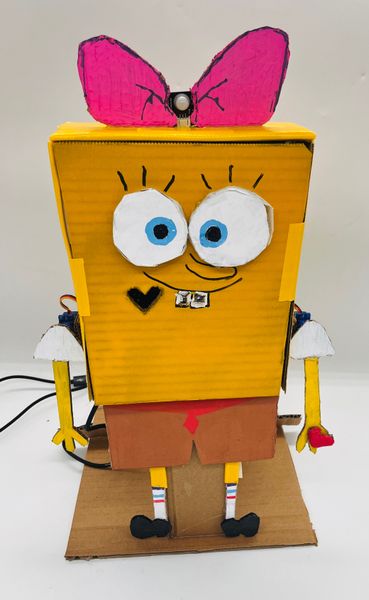
Students learn how robots work by taking apart a micro:bit pet to see its components, then explore robots across media and real life. They investigate how sensors function and sort them by type, building understanding of the hardware they'll use. Through these lessons, students design their own robot, learning micro:bit block coding through virtual training and practice activities.
Students then prototype a cardboard enclosure for their robot, refining their design through a process log before building the final shell. Across the unit, they combine electronics and construction, planning and documenting each stage as they create a functioning robot that combines hardware, sensors, and coded behaviour.
The lessons
1
Microbit Pet Autopsy — Product AnalysisAssessment
55 min · 7 activities
- The brief
Your task
You are a Forensic Engineer. Last year's Grade 8s built cardboard pets powered by BBC micro:bits. Before they're recycled, your team must reverse-engineer one: work out how it functions, then carefully take it apart to discover what made it strong or weak. You'll document everything with annotated photos and a written analysis. Work in pairs or threes for the teardown — but each person completes their own annotations and written answers.
- 5 min
🔧 Microbit Pet Autopsy
Rules: Don't break the electronics. Cut cardboard and glue carefully. Save every servo motor and micro:bit — we reuse them in class. Photograph before you destroy. Work in your group for the teardown, but everyone fills in their own StudioLoom.
- Image annotate20 min
Autopsy photos #1 - the pet working
Photo 1 — the pet working: drop a pin on every INPUT (button, sensor) and every OUTPUT (LED, motor, sound).
Look for: Each pin points at one specific feature and says something a designer could act on — not just 'looks cool'.
- Image annotate20 min
Autopsy photos #2 - stripped electronics
Photo 2 — the stripped electronics laid out in order: pin where the POWER starts and where the SIGNAL travels (battery → micro:bit → motor/output). At least 2 pins per photo.
Look for: Each pin points at one specific feature and says something a designer could act on — not just 'looks cool'.
- Written answer10 min
Answer each in one sentence.
- Which cardboard connections broke easily, and which stayed strong?
- Were the motors mounted securely, or did they wobble loose?
- Wires: tidy or a spaghetti mess — and did that make it harder to take apart?
- Was the sensor placed where it could actually work, or blocked by the body?
- Your 2.0: what's the ONE structural change you'd make to build it stronger?
- Did you have to destroy the pet to get the electronics out? How would you redesign it so parts pop out without tearing the cardboard?
- Rubric shown to students
How this is marked
- Hand-in
Hand it in
2
Robot Design
45 min · 6 activities
Lesson shape
Opening5 minMini-lesson10 minWork time25 minDebrief5 min- Inspiration board15 min
Find 5 examples of robots in movies, TV, games, real-life, etc.
Upload 6 images. For each, write what makes this robot design successful for its context
- Mini-lessonReading12 min
Kindchenschema & Uncanny Valley
Two powerful ideas from psychology explain why some robots feel cute and safe — and why others make us deeply uncomfortable.
Read all three cards. For each one, think of one real robot or character (from a film, game, or real life) that fits that idea.
- Kindchenschema: Konrad Lorenz's idea that humans are hard-wired to find certain features — large eyes, round face, small nose, chubby cheeks — cute and non-threatening. Robots designed with these features feel friendly and safe.
- Uncanny Valley: Masahiro Mori noticed that as a robot looks MORE human, people feel MORE comfortable — up to a point. Just before it looks perfectly human, comfort drops sharply into 'eerie' or 'creepy' territory. That dip is the uncanny valley.
- Design implication: Robot designers must choose: lean into Kindchenschema (clearly non-human but cute) OR push past the uncanny valley to near-perfect realism. Sitting in the valley is the worst outcome — and the most common mistake.
Look for: You can name an example for each card and explain in one sentence why it fits.
- OpeningExample sort8 min
Valley or No Valley? Sort the Robots
Before you hunt for your own examples, sharpen your eye by sorting these well-known robots and characters into the right zone.
Sort each robot or character into the correct category. Check your reasoning against the reveal note when you place something wrong.
Look for: All items placed correctly, and you can explain at least two placements out loud using Kindchenschema or uncanny valley language.
- Mini-lessonQuestion steps5 min
Checking Your Understanding
Before you move on to analysing real robots, make sure you can explain these ideas in your own words.
Answer each question in your own words. Use the vocabulary from the reading — don't just copy the definitions.
- In your own words, what is Kindchenschema? Give one feature a designer would use to trigger it.
- Describe what happens in the uncanny valley. Why does comfort DROP before rising again?
- A company wants to make a hospital robot that patients feel relaxed around. Should they aim for Kindchenschema or try to pass the uncanny valley completely? Give one reason for your choice.
Look for: Each answer uses at least one specific term (Kindchenschema, uncanny valley) and gives a concrete example or reason.
- Work timeImage annotate18 min
Robot Analysis: Annotate Real Examples
Now you'll apply both concepts to real robots — finding evidence of Kindchenschema features or uncanny valley effects directly on the design.
Find or use the provided images of two different robots (one that uses Kindchenschema and one that sits in or near the uncanny valley).
For each robot image, drop at least 4 numbered pins and write a note for each pin. Your notes must:
- Name the specific feature (e.g. 'large circular eyes', 'exposed metal joints')
- Link it to Kindchenschema OR uncanny valley — say WHICH and WHY
- Judge whether the design choice is effective for the robot's intended purpose
Add a short caption (2–3 sentences) below each image naming the robot, its purpose, and which zone it sits in.
Look for: Each image has 4+ labelled pins, every pin note names a feature AND connects it to one of the two concepts with a reason, and the caption identifies the design zone with a justification.
- DebriefWritten answer7 min
Share Your Findings
Comparing your robot choices with a partner will sharpen your analysis and expose ideas you might have missed.
Think (1 min): Look back at your two annotated robots. Which single annotation are you most confident about — and why?
Pair (3 min): Share your chosen robots with a partner. Discuss: Do you agree on which zone each robot sits in? Is there any pin note where you disagree — and why?
Share (3 min): Your pair shares one point of disagreement or surprise with the class. Be ready to defend your placement using Kindchenschema or uncanny valley language.
Look for: Your pair can articulate one genuine point of agreement AND one point of disagreement, each backed by a specific visual feature from the robot images.
3
Sensors in Real Life
45 min · 6 activities
Lesson shape
Opening5 minMini-lesson10 minWork time25 minDebrief5 min- OpeningMind map8 min
Sensors Around Us — First Thoughts
Before you go looking, let's see how much you already know — sensors are hiding in plain sight everywhere you go.
In the centre of the mind map is the word 'Sensors'. Add at least six branches — each one is a PLACE or SITUATION where you think a sensor is being used (e.g. 'entering a supermarket', 'my phone screen', 'the school bathroom'). Under each branch, try to add one idea about what the sensor is actually detecting.
Look for: At least six places are named, each with at least one idea about what is being sensed — no branch left blank.
- Mini-lessonReading7 min
How a Sensor Works
Every sensor does the same three-step job — once you see the pattern, you'll spot it in every example you collect.
Read the three cards. For each one, try to think of one sensor you already know that fits that part of the chain.
- Input (what it senses): Something in the environment changes — light level, temperature, motion, pressure, sound. That change is the signal the sensor is waiting for.
- Sensor (how it detects): A device reads the change and converts it into an electrical signal a system can use. Examples: a light-dependent resistor (LDR), a microphone, a touch screen.
- Output (what happens next): The system acts on the signal — a light turns on, a door closes, a phone unlocks, an alarm sounds. The output is the visible result of the sensor doing its job.
Look for: You can name the input, the sensor, and the output for at least one sensor you already know before moving on.
- Work timeSort into categories12 min
Now that you know what a sensor is, let's see if you can sort real-world examples by the type of stimulus each one detects.
Below are 12 sensor examples from everyday products. Click an item, then click the correct stimulus category to place it. Sort every example before checking your answers.
Look for: All 12 sensors placed into the correct stimulus bucket — aim for a full clean round with no wrong placements.
- Mini-lessonExample sort7 min
Sensor Chain Sort
Before you head out to find your own examples, sharpen your eye by sorting these real-world sensor descriptions.
Sort each description into the correct column — is it describing the INPUT, the SENSOR, or the OUTPUT?
Look for: All items placed correctly — or any wrong placements corrected after reading the hint.
- Work timeImage annotate18 min
5 Real-World Sensor Examples
Now you'll build your own evidence base — finding and analysing real sensors in the world will directly inform the sensor choices you make for your Microbit robot.
Find 5 sensors used in real locations around you or in photos you can take or look up. For each one:
- Take or find a photo and upload it.
- Drop a pin on the exact sensor (or where it is located).
- Write a note for that pin using this structure: — Location: where is it? (e.g. 'entrance of a supermarket', 'inside a car dashboard') — Input: what does it sense? (e.g. 'motion / infrared heat from a person') — Sensor type: what kind of sensor is it? (e.g. 'PIR sensor', 'light sensor', 'pressure pad') — Output: what happens as a result? (e.g. 'automatic doors open', 'engine warning light turns on')
Each example must be a DIFFERENT type of sensor. Aim for variety — not five motion sensors.
Look for: Five annotated photos, each with a pin that correctly identifies the sensor location and a note covering all four points (location, input, sensor type, output) in specific terms — not vague descriptions.
- DebriefWritten answer5 min
Sensor Comparison & Debrief
Comparing your five sensors with a partner will show you patterns — and gaps — that are hard to spot when you're working alone.
Share your five examples with the person next to you. Together, discuss:
- Which of your ten sensors between you is the most surprising or unexpected?
- Did you both pick any of the same sensor type? If yes, how are the outputs different?
- Which ONE sensor from either of your lists do you think would be most useful in a Microbit robot, and why?
Be ready to share your answer to question 3 with the class.
Look for: You can name one sensor from your combined list and give a clear reason — linked to input, sensing, and output — why it would work well in a Microbit robot context.
4
Design Your RobotAssessment
15 min · 4 activities
- The brief
Your task
What you're making You are designing and making a robotic pet — an aesthetic shell that houses real electronics.
Who it's for Your robotic pet should feel like a real product — something a user could pick up, interact with, and upgrade over time. You are designing for longevity: the person who owns this robot should be able to improve it in the future without having to start again.
What you must include Use your research into psychological design to generate 2 distinct design ideas for your robotic pet, then develop your chosen direction into a final design. Your designs must show:
- How the Microbit sits inside the shell, with its LEDs visible to the user
- How the expansion board is housed
- How the PIR sensor is positioned and functional
- How the Microbit pins and USB port remain physically accessible for future upgrades
- Visual communication of how the technology fits inside the aesthetic shell (cross-sections, exploded views, or annotated diagrams)
Your v1.0 design must be ready to make with the components above. …
- Photo or file upload15 min
Upload photos of your 2 designs here
Upload your work.
- Rubric shown to students
How this is marked
- Hand-in
Hand it in
5
Intro to Microbits
45 min · 3 activities
Lesson shape
Opening5 minMini-lesson10 minWork time25 minDebrief5 min- OpeningExample sort8 min
micro:bit Term Match
Before you explore the micro:bit in depth, make sure you can connect each technical term to what it actually does.
Sort each term into the column that best matches its description. Click a term, then click the correct description column to place it.
Look for: All five terms placed correctly, with no remaining items in the unsorted bank.
- Mini-lessonImage annotate12 min
Now that you know the vocabulary, let's see where each part actually lives on the micro:bit — and what it does.
Using the interactive diagram from microbit.org drag and drop each labelled pin (LED matrix, buttons A & B, edge connector, USB port, accelerometer, compass, processor) onto the correct location on the board. Then write one sentence for each component explaining what it does or how the micro:bit uses it.
Look for: All components are placed correctly on the image
- Image annotate20 min
Take a screenshot of your block code and annotate what each part does
- Take a screenshot of your block code
- annotate each block with a description of what it did
Look for: Each annotation tells the viewer what it did.
6
Virtual Microbit Training
45 min
Lesson shape
Opening5 minMini-lesson10 minWork time25 minDebrief5 minNo activity detail for this lesson.
7
Checkpoint 1Checkpoint
No activity detail for this lesson.
8
Virtual Microbit Training #2
45 min
Lesson shape
Opening5 minMini-lesson10 minWork time25 minDebrief5 minNo activity detail for this lesson.
9
Prototype your enclosureAssessment
30 min · 5 activities
- The brief
Your task
What you're making You will select one of your enclosure designs and build a full cardboard prototype of the main robot body. This prototype is your physical proof-of-concept — it shows that your chosen design actually works before any final materials are committed to.
Who it's for Your prototype is made for your design team and teacher to test and evaluate. A working prototype lets everyone catch problems early, justify design decisions, and plan improvements — exactly how professional engineers and product designers work.
What you must include Your cardboard enclosure must:
-
Securely house the micro:bit, the expansion board, and the PIR sensor
-
Allow a USB cable to be plugged in from outside the enclosure to the micro:bit (without opening or dismantling anything)
-
Keep the micro:bit LED panel visible from the outside
-
Give easy access to all pins on the expansion board (for connecting and disconnecting components without tools or force)
-
Be sturdy enough to handle during testing
-
Allow upgrades to the robot later
Your process evidence must include: …
-
- Work timeProcess log10 min
Your process log is the proof that you're solving problems as you build — each photo and note captures a real decision you made in the workshop.
After each making session, add one log entry: photograph the step you just completed (joint, fold, hole, or assembly), then write a note that says what you did, what surprised you or changed from your plan, and any problem you solved to keep building.
Look for: Each entry shows a clear before/after — a photo of work-in-progress and a note that proves you tested your plan, adapted it, and moved forward.
- Image annotate20 min
Final Prototype
Upload 1 photo of your prototype. Use red to show the problems, green to show the areas that worked, and yellow for what you would change in version 2.0
Look for: Each pin points at one specific feature and says something a designer could act on — not just 'looks cool'.
- Rubric shown to students
How this is marked
- Hand-in
Hand it in
10
Final Robot PlansAssessment
15 min · 4 activities
- The brief
Your task
What you're making You are producing a precise, fully dimensioned technical drawing of your final robot design — top view and side view — completed on grid paper. You will also create an internal wiring and electronics mounting diagram as part of the same drawing set.
Who it's for These plans are your definitive design specification — the document that someone else (or future-you) could pick up and use to build your robot exactly as intended. Clear, complete plans are the mark of a designer who has thought every decision through.
What you must include
-
2 views (top, front, side - whichever 2 show the most) of your final robot, drawn accurately on grid paper
-
All dimensions labelled clearly on both views
-
Internal wiring and electronics mounting drawn in a different colour from the structural elements, showing how components are connected and where they sit inside the robot
-
Decisions and changes from earlier drafts reflected and noted where relevant
-
Evidence of your process leading to these final plans (research, sketches, planning, and testing notes should accompany this submission)
What a strong response looks like …
-
- Photo or file upload15 min
Upload your work.
- Rubric shown to students
How this is marked
- Hand-in
Hand it in
11
Build the shell
45 min · 1 activity
Lesson shape
Opening5 minMini-lesson10 minWork time25 minDebrief5 min- 5 min
Build your cardboard shell
If you need to use spray paint you'll need to pass the safety test first